05 January 2026
How to insulate a van: a step-by-step guide
6 minutes
-
Plan before you start: Strip the van, clean the metal and check for rust to create a solid base for insulation.
-
Use a layered approach: Combine sound‑deadening mats, rigid foam boards, flexible insulation and a vapour barrier for the best results.
-
Don’t forget the details: Seal gaps with expanding foam, tape foil joints neatly and leave space for wiring and ventilation if needed.
-
Windows are the biggest source of heat loss in a van: Covering them with reflective foil mats can make a big difference to keeping heat in and light out.
-
Ventilation matters: Your van needs good airflow to prevent condensation. Roof fans, floor vents or a small dehumidifier are all good solutions.
Thinking about converting your van or simply making your campervan warmer for winter? Van conversions are a fun project, and a well‑insulated van stays cosy in cold weather, cooler in summer and quieter on the road. With so many options and van insulation advice online, it can be hard to know where to start.
That's why we've created this step-by-step guide on how to insulate a van, from the materials and tools you'll need to installation steps. Ready to start? Let’s dive in.
What's covered:
- What materials do I need for insulating a van?
- What tools do I need for insulating a van?
- How to insulate a van step-by-step
- Preparation
- Insulating the floor
- Insulating the ceiling and walls
- Insulating the windows
- Extra van insulation tips
- FAQs
Get in touch with us! A member of the Howden team would love to help you find a policy that's right for you!
What materials do I need for insulating a van?
Before you start cutting boards or sticking foil, gather everything you’ll need. Let’s break it down into clear categories so you can tick them off as you go.
Insulation materials:
-
Sound deadening mats: These are usually the first layer applied to bare metal. They stop vibrations and eliminate that “tinny” echo you hear in an empty van. Once fitted, they make driving noticeably quieter
-
Rigid foam boards (PIR or XPS foam insulation): Best for large, flat areas such as floors, ceilings and the van's side panels. They deliver excellent thermal performance without adding too much weight. PIR or XPS foam boards work well, and Celotex is a popular brand that many DIY converters trust.
-
Insulation roll: Wool insulation like glass wool or sheep's wool works well for awkward cavities where rigid boards won’t fit. If you prefer a modern alternative, 3M Thinsulate offers great flexibility and moisture resistance.
-
Reflective foil: This layer helps reflect heat back into the van in winter or away from it in summer. It often doubles as a vapour barrier to prevent condensation from causing rust. Foil-faced bubble wrap or multifoil products are common choices.
Installation supplies:
-
Plywood battens to create a secure framework to hold foam boards firmly in place
-
Plywood sheets for the subfloor
-
Aluminium foil tape: Use this to seal joints and edges neatly, creating a continuous barrier.
-
High-temperature spray glue: Keeps foam and fabric firmly in place, ensuring they don't peel off when the metal heats in the sun.
-
Expanding spray foam: Ideal for filling tiny gaps and sealing awkward corners where other materials can’t reach.
What tools do I need for insulating a van?
-
Sharp utility knife or fine-toothed saw for cutting rigid boards.
-
Heavy‑duty scissors for flexible materials
-
Measuring tape and marker
-
Safety gear: Gloves, eye protection, and a mask for dust control
-
Screwdriver or drill to remove existing van fixings
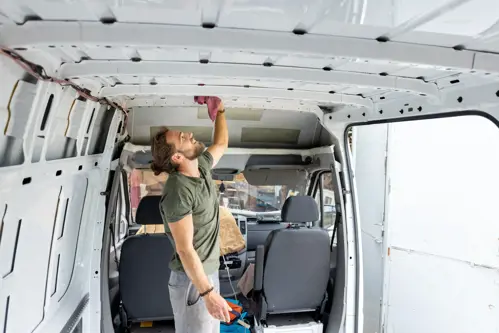
How to insulate a van step-by-step
1. Preparation
Getting the van ready is the first step of a successful insulation project. This involves stripping everything out and cleaning up so you have your blank canvas to work with.
Step 1: Strip out the interior
Remove everything inside the van, including furniture, fixings and any built‑in units. Working with an empty shell gives you full access to every surface and makes the job far easier.
Step 2: Remove the floor and wall panels
Lift out the existing floor completely, then remove the existing wall panels and any trim pieces. Store screws and clips safely because you’ll need them later when refitting. Work carefully to avoid bending panels or damaging fixings.
Step 3: Clean the metal surfaces
Once the panels are off, you’ll see the van’s bare metal. Clean it thoroughly with a degreaser or a vinegar solution so adhesives bond properly. While cleaning, check for rust and treat any patches before moving on.
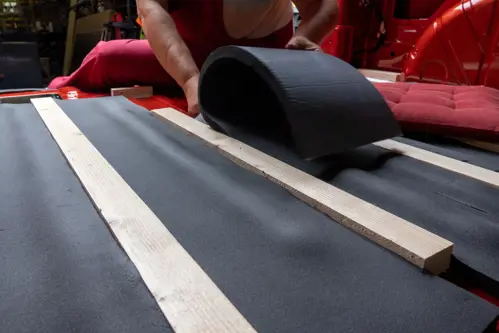
2. Insulating the floor
Once you van is completely stripped, cleaned and prepped, you can now begin insulating the floor.
Step 1: Apply sound deadening mats
Start with the bare metal floor. Lay butyl‑based sound deadening mats across the panels to reduce vibration and road noise. Press them firmly using a roller or squeegee so they bond completely. You don’t need to completely cover the floor, but about 50-70% is enough to quieten the van.
Step 2: Fit wooden battens
Next, create a framework for your insulation boards. Fix wooden battens directly to the floor using screws and adhesive where needed. Space them evenly so they support the boards and provide fixing points for the plywood layer later. If you plan to run electrics under the floor, you could leave channels for wiring.
Step 3: Install rigid foam boards
Cut your PIR foam boards to fit snugly between the battens. A fine‑toothed saw or sharp utility knife works well for clean cuts. Push each board into place and seal any small gaps with either roll insulation or expanding spray foam.
Step 4: Add a vapour barrier
install a layer of reflective foil (e.g. foil-faced bubble wrap or multifoil) over the insulation and battens. This will act as your vapour barrier to prevent condensation from reaching the metal. Ensure all seams and edges of the foil are completely sealed in place with aluminium foil tape.
Step 5: Finish with a plywood subfloor
Finally, screw plywood sheets onto the battens to form a strong subfloor base for your chosen floor covering. Once this is down, you’re ready for vinyl, carpet or whatever finish suits your build.
3. Insulating the ceiling and walls
These areas make the biggest difference to temperature control, so take your time and work methodically.
Step 1: Apply sound deadening mats
Start with the bare metal on the roof and wall panels. Just like the floor, fit your butyl‑based mats to large flat sections to reduce vibration and road noise. Press them firmly with a roller so they bond completely. Again, you don’t need full coverage, so place it strategically.
Step 2: Build and install your plywood framework
Fix wooden battens to the walls and ceiling where you plan to attach cladding later. Secure the timber to the van’s metal ribs using self‑drilling screws. Space them evenly to create a secure framework for insulation boards and future panelling. Leave gaps for wiring runs and ventilation points so nothing gets blocked.
Step 3: Fit rigid foam boards
Cut PIR boards to size for the ceiling and main wall panels. Push each board snugly between battens and seal any small gaps with expanding spray foam.

Step 4: Fill cavities with flexible insulation
For awkward spaces and ribs, use wool insulation or Thinsulate. Tuck it in gently without compressing it, as squashing reduces its effectiveness. For any smaller gaps where flexible insulation won't fit, you can fill with expanding spray foam.
Step 5: Add a reflective foil layer
Cover the insulated surfaces with a reflective foil or multifoil for your vapour barrier, sealing the seams and edges with aluminium foil tape to create a continuous layer.
Step 6: Refit the van wall panels
Replace the van wall panels using the original screws and fixings once the insulation and vapour barrier are in place. Make sure each panel sits evenly and is firmly secured.
4. Insulating the windows
Windows are the biggest source of heat loss in a van. You can’t fill them like a wall, but there are smart ways to keep warmth in and condensation out. One of the best solutions is reflective foil mats. These mats are usually thin rolls of foil filled with bubbles, like bubble wrap, or microfibre. They’re lightweight, energy‑efficient and easy to handle.
Ideally, you want reversible mats with one reflective side and one dull side. The shiny surface reflects light and heat, while the dull side absorbs it. This means you can flip them depending on the season or your preference.
For a more permanent option, you could use foil tape around the edges. It might look a little rough, but it blocks every crack of light. Simply covering the windows overnight makes a big difference, both for keeping heat in and shutting out light.
Extra van insulation tips
Wrapping your van in insulation keeps it warm, but good ventilation is just as important to prevent condensation. Aim for at least one air inlet and one outlet so fresh air can circulate. This could be a roof fan paired with a sliding window, or even a discreet floor vent that draws in cool air from beneath the van during summer. For damp winter months, a compact dehumidifier is another smart option to keep moisture under control.
This is a marketing article from Howden Insurance. The information in this guide is intended for general guidance only and is accurate at time of publication.
How to insulate a van: FAQs
What is the best thing to insulate a van with?
Van insulation works best by using a combination of materials. Use rigid PIR foam boards for large flat areas like floors, walls and ceilings, and flexible insulation such as wool or Thinsulate for cavities. You should also add reflective foil as a vapour barrier.
How much does it cost to insulate a van in the UK?
In 2025, the cost to insulate a van in the UK typically ranges from £200 to £800 for a DIY project using standard materials, while professional services for insulation and lining generally start around £800 to £1,500 depending on van size.
Do you need a vapour barrier in a van?
It is not strictly mandatory, but it is highly recommended, especially if you use fibrous insulation (like sheep's wool or glass wool) to prevent it from absorbing moisture and causing rust.
Do I have to tell DVLA if I put windows in my van?
In most cases, you do not need to notify the DVLA simply for adding windows. However, you must inform them if the windows change the vehicle's classification (e.g., from commercial to private) or if they are part of a conversion that increases the number of passenger seats. If you apply for official "motor caravan" status, the DVLA specifically requires at least two windows on one side of the main body to provide natural light to the living area.
Do I need to tell DVLA if I convert a van?
You are not legally required to re-register the "body type" on your V5C just because you converted the interior. However, you must update the DVLA if you change the number of seat-belted seats.
Also read: Do I need to register my van as a campervan?
Does insulating a van stop condensation?
Insulation reduces condensation by keeping the interior surfaces warmer, preventing water vapor from turning into liquid on contact with cold metal. However, it does not "stop" it entirely. You must combine insulation with proper ventilation (like roof fans or window vents) to remove moisture-laden air before it can settle.
Can you do 70 mph in a van?
Speed limits depend on your van's weight and official V5C classification. Standard vans (under 3.5 tonnes) are generally limited to 60 mph on dual carriageways and 50 mph on single carriageways, though they can do 70 mph on motorways. If your vehicle is officially classified as a "motor caravan" and has an unladen weight of less than 3.05 tonnes, you can follow car speed limits: 70 mph on dual carriageways and 60 mph on single carriageways.
Also read: Van speed limits in the UK explained
Can I legally live in my van in the UK?
You can legally live in a van as long as it’s roadworthy, taxed and insured. Overnight parking is the tricky part, as many councils ban stays in public car parks and issue fines for unauthorised camping. For full‑time van life, stick to designated camper sites or get permission to park on private land.
More resources
Latest van guides
Everything you need to know about vans and the insurance policies which cover them. Explore more topics in our Van Insurance Guides.
- Your guide to multi van insurance
- 1 day van insurance: a complete guide
- Can I drive a van on my car insurance?
- The 10 best electric vans in 2025
- The 10 best small vans in 2025
- Van insurance groups explained
- How to save money on your van insurance: 20 practical tips
- Is my van insured?
- Van insurance for convicted drivers: everything you need to know
- The 10 cheapest vans to insure in 2025
- Van speed limits in the UK explained
- A comprehensive guide to the different types of vans
- How to insulate a van: a step-by-step guide
- What are the best van locks in 2025?
- Van insurance for young drivers: Your essential guide for 2026
- Is there vat on van insurance? Your questions answered
Learn more about the ins-and-outs of vans on our blog:
- 21 of the smartest van storage ideas
- Your van’s essential vitamins this winter!
- Are electric vans worth it?
- 2024’s most popular van revealed
- The UK’s most stolen work van!
- Six things to know before you buy an electric van
- Do I need to register my van as a campervan?
- Crash for cash warning as van premiums rise
- Is campervan insurance cheaper than van insurance?
- Why is van insurance so expensive?